Post

Visualizzazione dei post da agosto, 2019

How to add your logo to a scan in Meshmixer

Immagine
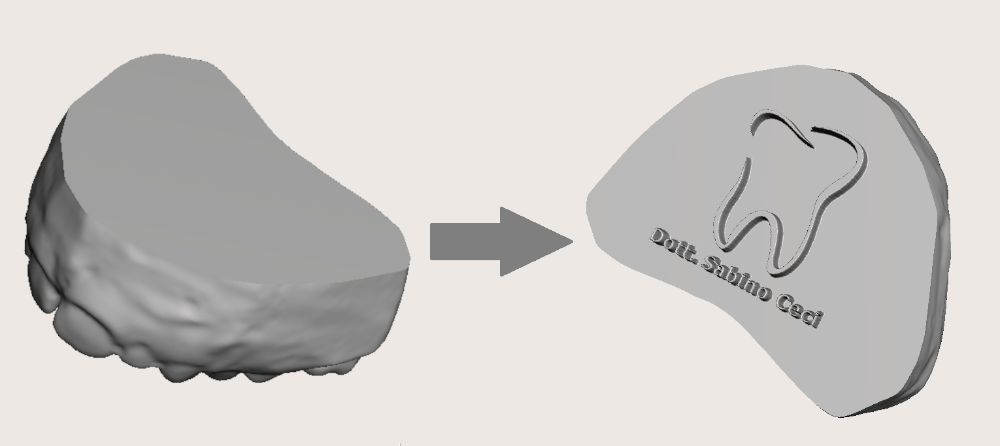
In this post I'll show you the step by step procedure to add your personal logo to a digital scan in Meshmixer. 1) Generate a 500x500 px black box in Paint or other imaging software 2) Add your personal logo 3) Open Meshmixer and import your scan 4) Select the surface where you want to put your logo 5) Click on Edit >  Remesh or press R on the keyboard 6) Set these values and then click on accept As you can see the result is an high density mesh 7) Go into Sculpt mode > Select Surface > Stencils > Click on the big plus button 8) Select your logo  9) Then click again on Stencils and select your logo 10) Set these values and click on the surface to apply the logo As you can see the result is great , especially if you generate an high contrast logo. If you want you can also apply a different kind of logo, with a solid base extruded and an intruded text. The step by step is the same, except for the l

How to make a scan solid and how accurate is this process

Immagine
In this post we will see how to keep the quality of the mesh during the solid transformation of the scan in Meshmixer and how precise is this process. 1) First of all add a base to the arch scan: 2) Then select  make solid in the Edit section:  3) Wait for the preview loading and subsequently set Accurate for  Solid Type  and the maximum value for  Solid Accuracy  and  Mesh Density . Click on the Update button and the accept : The transformation process is complete. To prove the accuracy of the transformation, look at this series of images (the measurement is done by selecting the points by hand): Lenght A: 17,376 mm Lenght B: 17,301 mm Lenght A: 9,8342 mm Lenght B: 9,7897 mm Lenght A: 63,311 mm Lenght B: 63,213 mm From this comparison it is possible to notice how extremely minimal is the difference in terms of dimensions and also that the shape of the solid is perfectly corresponding to the original scan.

Come trasformare una scansione in solido e quanto è accurato il processo di trasformazione

Immagine
In questo articolo vedremo come mantenere la qualità della mesh durante il processo di transformazione in solido della scansione modificata in Meshmixer e quanto questo processo sia accurato. 1) Prima di tutto aggiungiamo la base al modello scansionato: 2) Quindi selezioniamo l'opzione make solid :  3) Attendiamo il caricamento dell'anteprima e successivamente impostiamo i valori Solid Type su Accurate e S olid Accuracy e M esh Density al massimo. Cliccare sul tasto Update e dopo su accept : La procedura di trasformazione in solido è completa. Per dimostrare l'accuratezza della trasformazione osserviamo questa serie di immagini (la misurazione è effettuata selezionando i punti a mano): Lunghezza A: 17,376  Lunghezza B: 17,301 Lunghezza A: 9,8342 Lunghezza B: 9,7897 Lunghezza A: 63,311 Lunghezza B: 63,213 Da questo confronto è possibile notare come la differenza in termini dimensionali sia estrema

Formati di file 3D importabili in Meshmixer

Immagine
Oggi parleremo dei formati di file 3D, in particolare quelli compatibili con il programma Meshmixer. Questi sono: STL (STereoLithography) è un formato originariamente sviluppato per la stampa 3D stereolitografica ed è il formato di file più comunemente accettato nella stampa 3D. Memorizza solo i dati della geometria (posizione X,Y e Z di ciascun vertice di un triangolo) e ha una dimensione del file compatta. Ad esempio: ... facet normal -0.8 -0.6 0 outer loop  vertex 0 20 0  vertex 15 0 0  vertex 0 20 20 endloop endfacet facet normal -0.8 -0.6 0 outer loop  vertex 0 20 20  vertex 15 0 0  vertex 15 0 20 endloop endfacet ... OBJ , creato per la prima volta da Wavefront, è un formato semplice che memorizza le informazioni sui vertici per rappresentare una mesh 3D. Oltre alle posizioni dei vertici, memorizza anche la superficie normale più una coordinata UV che può essere mappata su una texture esterna. PLY (Polygon) è un format

Espansione digitale dell'arcata mascellare

Immagine
Ciao a tutti In questo primo post vi mostro come eseguire un'espansione digitale mascellare attraverso l'utilizzo del programma gratuito Meshmixer.